Click the download button and select the .msi version.
Go to the Downloads folder on your PC and run the installation
We recommend using Java 11 with the current JMRI versions. Starting with JMRI 5.0, the minimum Java version is 11.
JMRI needs a "Java Runtime Environment" (JRE) to run, but it will work fine with the larger "Java Development Kit" (JDK). A JDK is only needed if you want to work on JMRI development, i.e., make and compile changes.
Before getting a new version of Java, it's useful to check which version is currently installed on your computer. For example, open a "command" window on Windows by typing "Command Prompt" into the search bar next to the Windows Start icon. Then type:
java -version
IT IS RECOMMENDED THAT YOU REMOVE OLD VERSIONS OF JAVA BEFORE YOU UPGRADE. This avoids a number of reported problems. On Windows, for example, you can:
- Go to Windows Settings⇒Apps, find Java 8, and click "Uninstall."
- Alternatively, download the Oracle Java Uninstall tool and follow its instructions.
- It's recommended that you reboot after uninstalling before you install a new version of Java.
See the JMRI Setup and Install pages for more information.
Getting Java 11
For Linux distributions
Linux distributions should use the standard package manager. The package manager is apt for Debian-based distributions such as Ubuntu, Mint, and Raspberry PI OS. For Red Hat-based distributions such as Fedora and CentOS, the package manager is dnf.
The following steps use the terminal command line. The apt and dnf commands require root authority via sudo.
Check for current Java installs.
java -version
Java was previously installed.
openjdk version "1.8.0_362"
OpenJDK Runtime Environment (build 1.8.0_362-8u362-ga-0ubuntu1~22.04-b09)
OpenJDK 64-Bit Server VM (build 25.362-b09, mixed mode)
The Java 1.8 version needs to be removed. That process is outside the scope of this document. Search for linux remove java. The steps involved depend on the distribution, the source, and the Java version. An alternative is to use the local Java within the JMRI approach. See Local Java
Java has not been installed
Debian based:
Command 'java' not found, but can be installed with:
sudo apt install default-jre              # version 2:1.11-72build2, or
sudo apt install openjdk-11-jre-headless  # version 11.0.18+10-0ubuntu1~22.04
sudo apt install openjdk-17-jre-headless  # version 17.0.6+10-0ubuntu1~22.04
sudo apt install openjdk-18-jre-headless  # version 18.0.2+9-2~22.04
sudo apt install openjdk-19-jre-headless  # version 19.0.2+7-0ubuntu3~22.04
sudo apt install openjdk-8-jre-headless   # version 8u362-ga-0ubuntu1~22.04
Red Hat based:
bash: java: command not found...
Install package 'java-11-openjdk-headless' to provide command 'java'? [N/y]
Reply N, JMRI needs the full Java version.
Install Java 11
sudo apt install openjdk-11-jre Debian based
sudo dnf install java-11-openjdk Red Hat based
Java Installers for Windows, macOS, or Linux 32-bit or 64-bit computers
This section describes two sources of Java 11 installers for 32-bit or 64-bit Windows and macOS machines. These are our recommended solutions. These can also be used for Linux if the above package-manager-based solutions are unavailable.
-
Azul - Go to the bottom of the page, past the advertising, select your OS type (Windows, macOS, Linux), then if needed the computer CPU architecture (we recommend 64-bit if you have a 64-bit computer), then pick the appropriate download from the page.
Windows users should pick the ".msi" installer, which properly sets up various registry values. Rebooting after installing is recommended.
macOS users might find the Adoptium installer (next item) easier to use than the Azul download.
-
Adoptium (Eclipse) - This website refers to a Java JDK as "Temurin," which is confusing. Ensure that "Temurin 11" is selected, then press the large "Latest Release" button.
On Windows: when you run the Java installer, select the "JavaSoft (Oracle) registry keys" option. Rebooting after installing is recommended.
On macOS: This will download a .pkg file—Double-click on it to run the installer.
Additional Source of Installers for 64-bit computers
If, for some reason, the installers in the previous section are not suitable, there are several other sources for Java installers for 64-bit Windows, macOS, and Linux computers:
-
OpenLogic - Select your OS type (Windows, macOS, Linux). OpenLogic only has a 64-bit version so make sure you have a 64-bit computer. Pick a download from the page.
On Windows: when you run the Java installer, select the "JavaSoft (Oracle) registry keys" option. Rebooting after installing is recommended.
-
Oracle - The original JDK source, but this page requires you to set up a (free) Oracle account. No JREs available.
We recommend that Windows users pick the "Windows x64 Installer", which properly sets up various registry values.
- IBM - They provide JDKs under the "Semeru" name. Follow the installation instructions strictly.
Local install option
Since JMRI 4.99.9
Linux and macOS users can also install Java inside JMRI itself instead of installing it centrally on their computers. This can be useful if you need different Java versions for other programs, or if you can't do the central Java install or removal for some reason.
We recommend installing Java as described on the top half of this page when possible. The local installation described here is only for cases that can't be done. Note that you'll need to repeat this process every time you update JMRI, as the local Java install will be overwritten during the update process.
macOS
On macOS, the process is:
- Install JMRI into the Applications folder in the usual way.
- Download this Java install file.
- If this created a zulu11.56.19-ca-jre11.0.15-macosx_x64 folder in your Downloads folder, proceed to the next step.
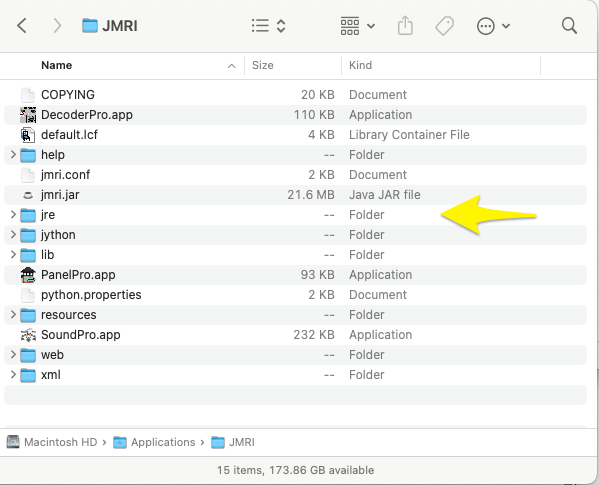
- Rename the zulu11.56.19-ca-jre11.0.15-macosx_x64 folder to just "jre."
-
 Open the JMRI folder in the Applications folder (this is where you would normally launch JMRI)
- Drag the jre folder from the Downloads folder to the JMRI folder.
When you're done, the JMRI folder contents should look like the picture to the right.
You're all set to start JMRI using that local version of Java!
Linux
On Linux, the process is:
- Download and place JMRI in the usual way.
-
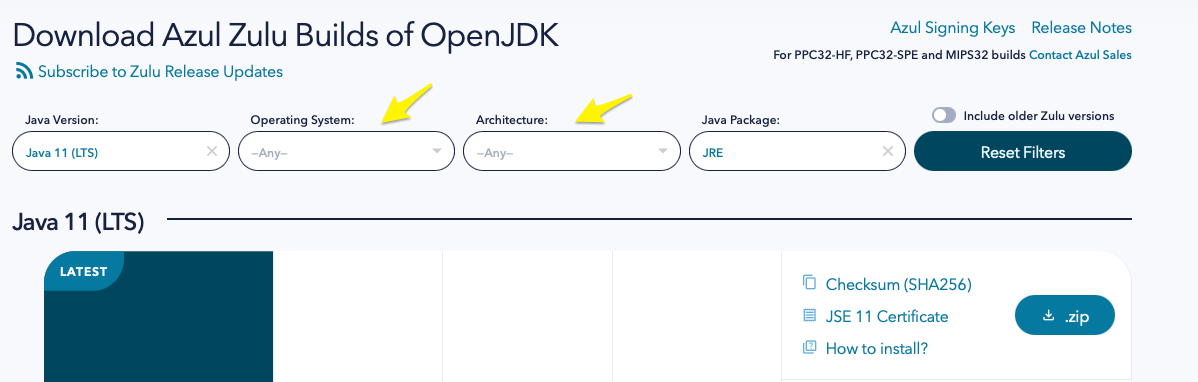 Go to the Azul downloads page and scroll down to the selection box (see to the right).
- Select your Linux type (RHEL, CentOS, Ubuntu, etc) and architecture (x86-64 bit). Leave Java 11 and JRE selected.
- Click on the .zip button (not any of the other ones!) to download onto your computer.
- If this created a directory, proceed to the next step. If it downloaded a .zip file, expand it into a directory before proceeding to the next step.
- Rename the resulting directory to just "jre."
- Open the JMRI folder you created in the first step (this is where you would normally launch JMRI)
- Move the new jre directory into the JMRI folder.
You're all set to start JMRI using that local version of Java!
Comments